Tests
Tests represent your Ranger’s interactions with their environment. They appear on cards as an aspect , plus an approach icon, followed by both a thematic and mechanical description of what your Ranger does if the test is successful.
You always have access to four common tests which you can reference on the common test reference card. Additionally, cards in play will provide other tests from which you can choose. On your turn, you can choose one test to perform on any card in play except for cards in other Rangers’ player areas (such as their equipped gear).
Most tests require that you interact with a card in play. When you interact with a card in play, other cards between you and the card with which you’re interacting can cause you to suffer fatigue.
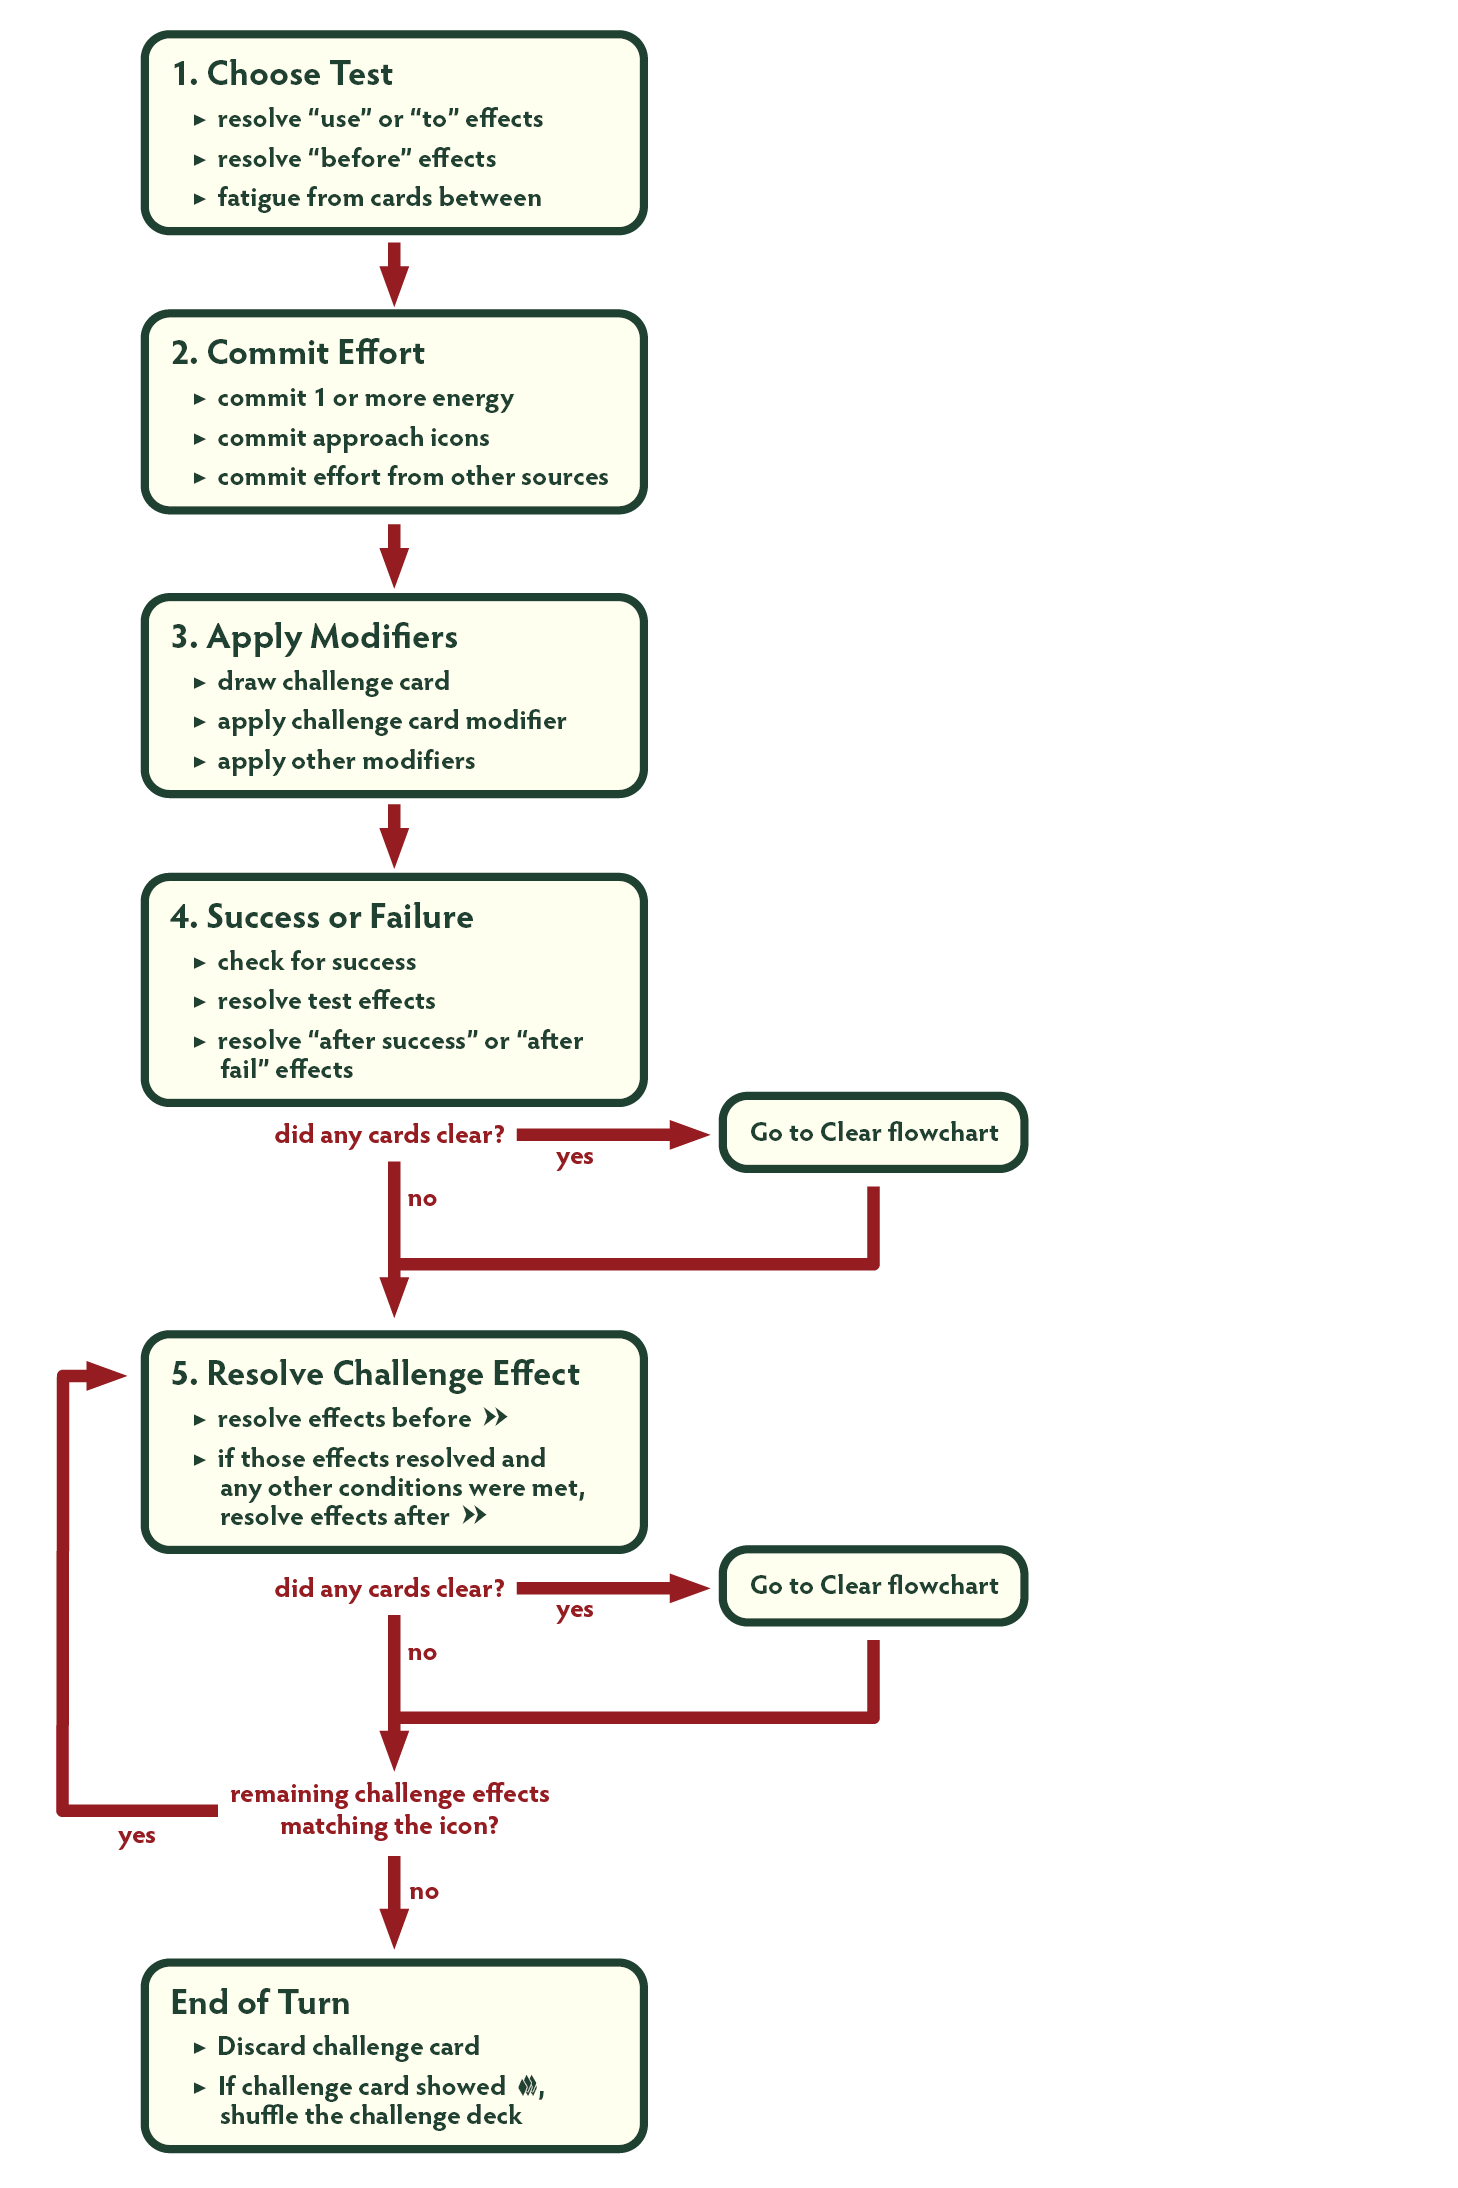
Rangers perform tests on their turn. To perform a test, you do the following steps in order:
1. Choose Test
Choose the test you are going to perform from a card in play that is not in another Ranger’s player area. Choose any other cards the test will interact with. Then spend any costs for performing the test (such as tests that require using a token or effects that are required "to" perform a test).
Then each ready card between you and the card with which you are interacting Fatigues you.
2. Commit Effort
Effort can be committed from several sources (listed below). It can be helpful to place all of your committed tokens and cards in the play area next to the test you are performing to more easily track your total committed effort, then discard them after the test is resolved.
Commit Energy: To initiate a test, you must first commit one or more energy tokens of the specified aspect by discarding them from your energy pool. Each energy committed adds one effort. If you don’t have at least one energy of the appropriate aspect to commit, you cannot perform that test.
Commit Approach Icons: You may discard any number of cards from your hand with an approach icon matching the specified type on the left-hand side of the card to add effort equal to the number of that icon on the card. When you discard a card for its approach icons, you ignore all information on the card that doesn’t explicitly refer to committing that card. There is no limit to the number of approach icons you can discard to commit to a test.
Commit Effort from Other Sources: Other game effects such as gear, helpful beings, or other Rangers’ Ranger tokens may commit effort when you perform a test. You add this effort to your committed energy and approach icons during this step to determine your total committed effort.
3. Apply Modifiers
Once you determine your Ranger’s total committed effort, draw and reveal the top card of the challenge deck. The face of a challenge card shows each of the four aspects along with a 0, +1, –1, or –2. Look for the aspect specified by the test and combine the value shown with your committed effort. Then apply any other modifiers from card effects in play that affect effort to find your resulting effort.
4. Success or Failure
If your resulting effort equals or exceeds the test's difficulty, you succeed. If your resulting effort is lower than the test difficulty, you fail. Note: Some tests show a difficulty of X. In these cases, the difficulty is dependent on circumstances unique to that test and will be explained elsewhere on that card.
If you succeed, resolve any effects noted in the text following the descriptor. If the effect scales off of your effort on the test, it scales off of your resulting effort.
If you fail, do not resolve the effects immediately following the descriptor. Often the only consequence for failing a test is failure itself, but if there are any effects for failing a test, they are explicitly mentioned in the text following the effects of success. For example, if you fail a Traverse test, you do not place any . Instead, you suffer 1 injury.
Some tests will also include effects that occur “whether you succeed or fail,” which are always resolved regardless of the outcome. After this step, resolve any effects that trigger "after you succeed" or "after you fail" a test.
5. Resolve Challenge Effects
On the revealed challenge card, you’ll find one of three unique challenge icons on a band of color across the bottom: the Crest, the Mountain, or the Sun. These icons match with challenge effects on cards in play.
After you resolve the effects of success or failure, you must resolve the instructions of each challenge effect matching the challenge icon drawn for the test that is shown on an active card. (Active cards are any ready cards in the surroundings, along the way , within reach of you, or in your player area. Ignore challenge effects on exhausted cards or within reach of other players. However, if you’re interacting with a card within reach of another Ranger, all cards within reach of that Ranger also count as active for this turn.)
The specifics of challenge effects order and conditions are covered in the challenge effects entry.
- After resolving a test, if any challenge cards that show the reshuffle icon were put into the discard, shuffle the challenge discard back into the challenge deck.
Note: Challenge effects on cards that were cleared or exhausted by the results of a test do not trigger, as they are either removed from play or rendered inactive before this step.
Test Flowchart